Path in a Lightning Flow with Stages
Want a similar setup like Sales Path in a Lightning Flow?
There isn't a standard component for that. But still, you can have your own customized Path for Lightning Flow within minutes.
This Path will help to track the stages in your flow which will be displayed at runtime on the flow’s screens. This component will indicate the progress of the task and will show the current stage and available stages in the flow screens.
This will be like a Guided Path where a user can see the progress of his work or check how many steps are remaining for his task to complete.
Scenario: The customer wants 3 screens named 'Plan', 'Design', and 'Visualize'. They want these names to be visible like a Stage/Progress on the top of the flow screens.
Solution:
Step 1: Create a Lightning Component
Step 2: Add Resources in the Flow
Prepare the flow to import the above Lightning Component that we just created.
'Active by default' should be checked for all 3 stages.
B. Assign the Stages to the Screen.
Create Assignment Element and join Screen 1 => Assignment => Screen 2.
Again, create Assignment Element and join Screen 2 => Assignment => Screen 3.
C. Add Lightning Component and configure the values.
Open Screen1, add the 'flowStages_field' Lightning Component which you created in Step 1.
Set Current Stage to {!$Flow.CurrentStage}
Set Stages to {!$Flow.ActiveStages}
Repeat the above steps for Screen2 and Screen3.
D. Save the Flow and Run/Debug to see the Path in your Lightning Flow.
Activate and you are good to go.
There isn't a standard component for that. But still, you can have your own customized Path for Lightning Flow within minutes.
This Path will help to track the stages in your flow which will be displayed at runtime on the flow’s screens. This component will indicate the progress of the task and will show the current stage and available stages in the flow screens.
This will be like a Guided Path where a user can see the progress of his work or check how many steps are remaining for his task to complete.
 |
| Path in Lightning Flow |
Scenario: The customer wants 3 screens named 'Plan', 'Design', and 'Visualize'. They want these names to be visible like a Stage/Progress on the top of the flow screens.
Solution:
Step 1: Create a Lightning Component
Go to Setup | Developer Console | File | New | Lightning Component.
Create a 'flowStages_field' component by following the steps listed in Display Flow Stages By Adding a Progress Indicator to a Flow Screen.
Step 2: Add Resources in the Flow
Prepare the flow to import the above Lightning Component that we just created.
Open Flow ==> Setup | Home | Process Automation | Flows.
(Create a new flow or select a flow on which you want to add the Path)
A. First, define all the possible stages in your flow.
Go to Toolbox | Manager | New Resources | Resource Type | Stage
(Create a new flow or select a flow on which you want to add the Path)
A. First, define all the possible stages in your flow.
Go to Toolbox | Manager | New Resources | Resource Type | Stage
 |
| Plan Stage |
 |
| Design Stage |
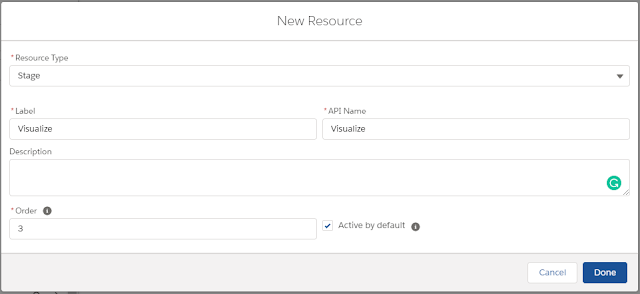 |
| Visualize Stage |
B. Assign the Stages to the Screen.
Create Assignment Element and join Screen 1 => Assignment => Screen 2.
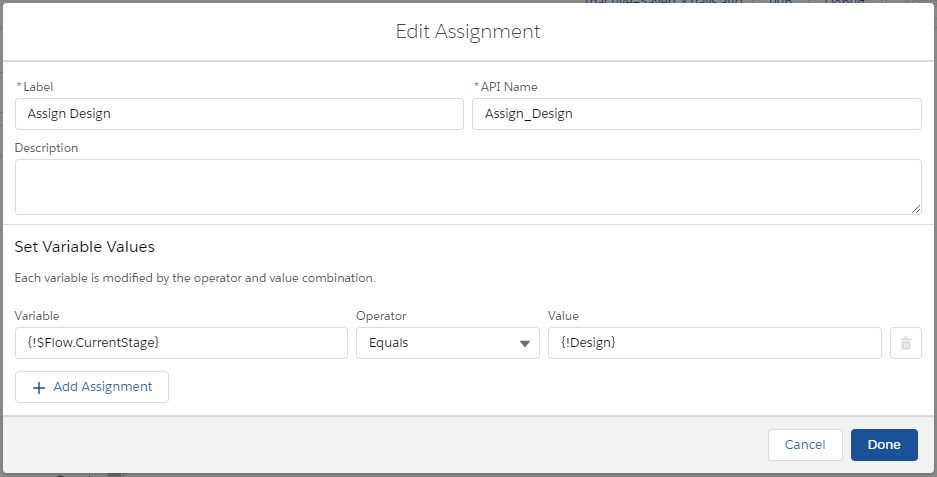 |
| Assign the Design Stage |
Again, create Assignment Element and join Screen 2 => Assignment => Screen 3.
 |
| Assign the Visualize Stage |
C. Add Lightning Component and configure the values.
Open Screen1, add the 'flowStages_field' Lightning Component which you created in Step 1.
Set Current Stage to {!$Flow.CurrentStage}
Set Stages to {!$Flow.ActiveStages}
Repeat the above steps for Screen2 and Screen3.
 |
| Add Lightning Component to Flow |
D. Save the Flow and Run/Debug to see the Path in your Lightning Flow.
Activate and you are good to go.
 |
| Lightning Flow Structure |


Comments
Post a Comment